Our Gitlab CI pipeline for Laravel applications
Published on December 12, 2018 by Mattias Geniar

We've been fairly public about the amount of testing we have for Oh Dear!. Freek has been showing bits and pieces on his Twitter to show the extent of that effort.
Having a huge test suite is nice, but integrating it into your development workflow is even better.
That's why we're releasing our Gitlab CI pipeline that is optimized for Laravel applications. It contains all the elements you'd expect: building (composer, yarn & webpack), database seeding, PHPUnit & copy/paste (mess) detectors & some basic security auditing of our 3rd party dependencies.
If you want to see it in action, skip to the "how to use" section.
Our Laravel CI pipeline #
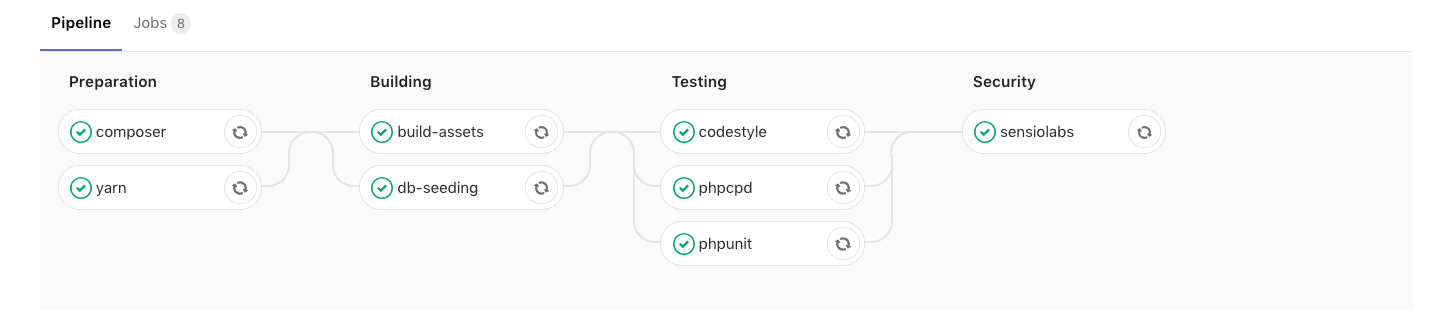
Here's what our current setup looks like.
We'll break things down in this blogpost to explain why we've made some of the decisions we've made and how to set up a system like this.
Setting up Gitlab CI #
We use the free version of Gitlab to host our Git repositories and launch the jobs that run all our testing. However, since we run the free version (and as a startup, we're cautious about our running costs), we are limited to what kind of CI we can run on Gitlab.
As such, we've installed and run our own Gitlab Runner, that uses Docker containers to run our testing. The Gitlab.com servers essentially instruct our servers to run the entire pipeline and we report back the status to Gitlab for reporting.
Setting up the local Gitlab Runner with Docker is pretty straight-forward and their documentation handles this perfectly. Some minor things we changed on our end to speed things up are related to the concurrency of the jobs.
$ cat /etc/gitlab-runner/config-main.toml
concurrent = 2
check_interval = 0

[[runners]]
  name = "ohdear/ohdear"
  url = "https://gitlab.com"
  token = "(this is secret, don't share this)"
  executor = "docker"
  [runners.docker]
    tls_verify = false
    image = "php:7.2"
    privileged = false
    disable_cache = false
    volumes = ["/cache"]
    shm_size = 0
  [runners.cache]
By default we run our tests on PHP 7.2 and allow for 2 jobs at the same time.
CPU load & Docker containers #
We run the testsuite on one of our own systems. When the tests start, Docker starts several containers. One of them is a MySQL container where the database seeding will happen.
$ docker ps
COMMAND                  CREATED             NAMES
"docker-php-entryp..."   2 minutes ago       runner-...-build-4
"docker-entrypoint..."   2 minutes ago       runner-...-mysql-0
When multiple tests run in parallel, CPU load tends to spike.
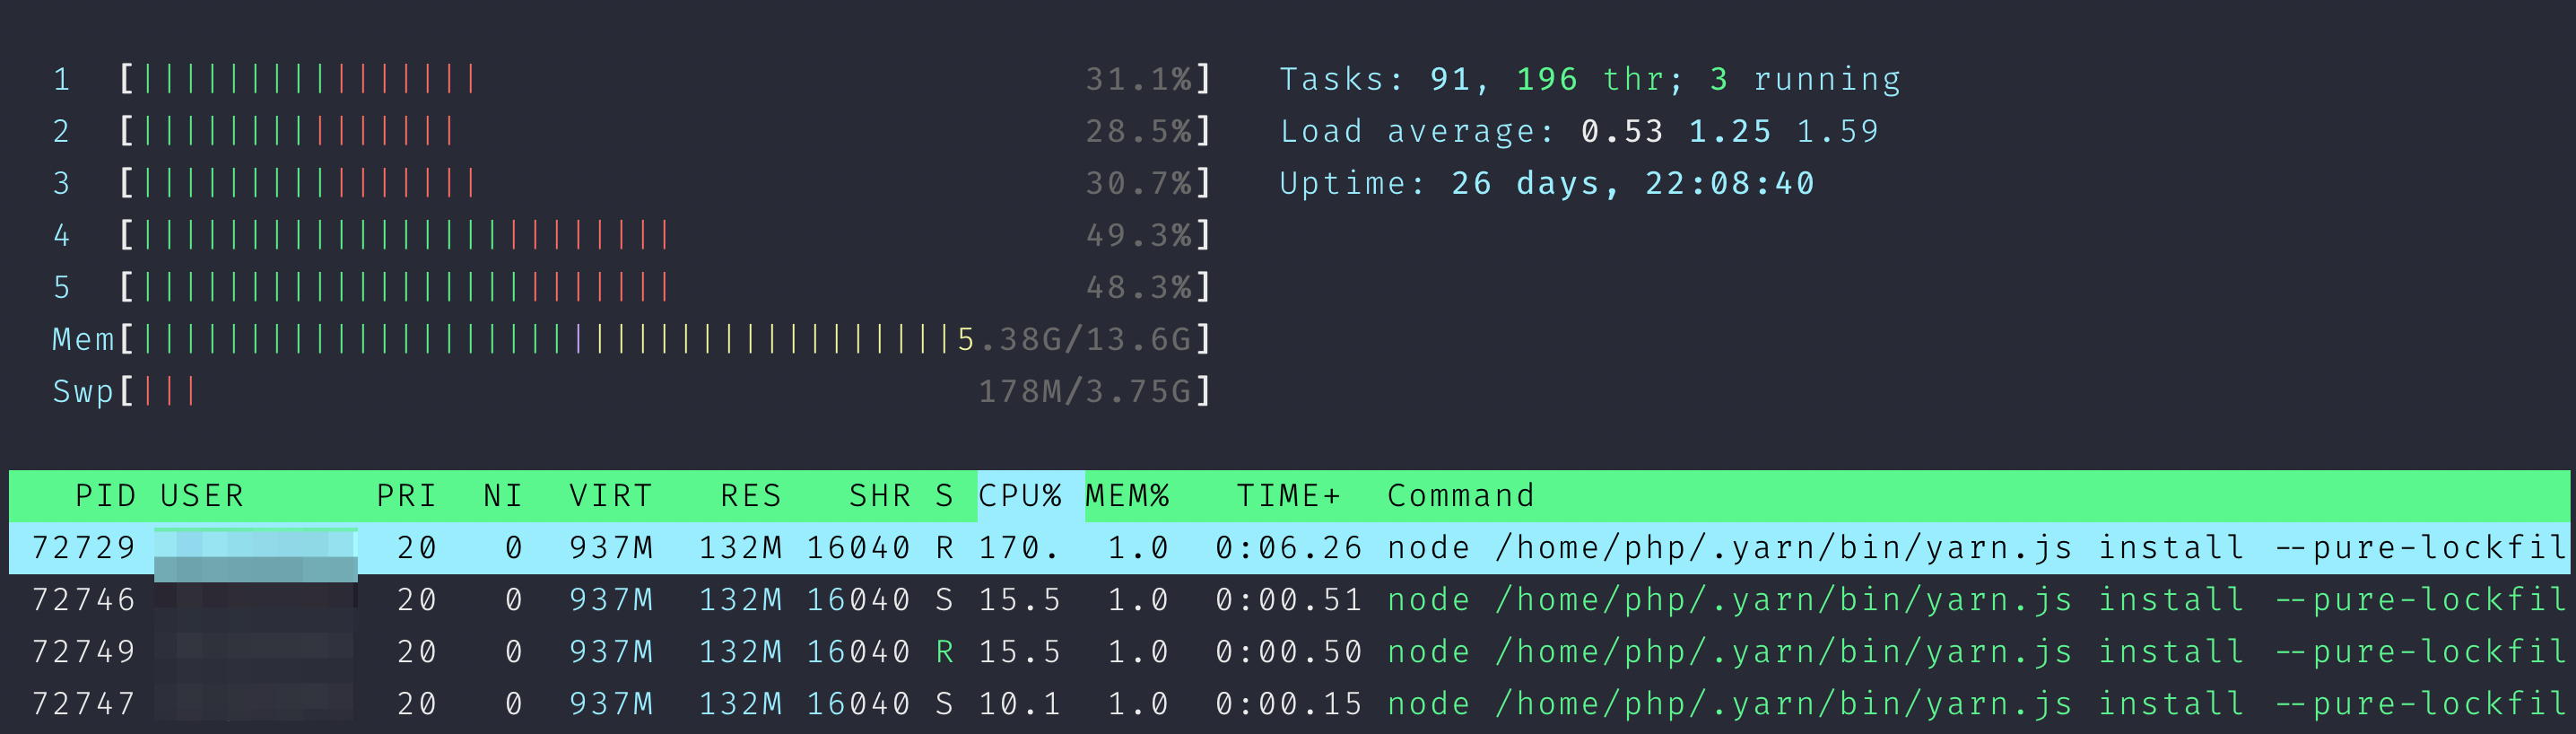
Remember that multiple containers will run at the same time, potentially pushing your server to 100% CPU usage. For this reason we decided to run these on one of our test machines, even though production servers have a healthy abundance of free CPU and memory.
But, in order for us to handle spike usage, we need to keep those resources free & available.
To keep CI fast we ended up running our test suite in parallel on GitHub Actions.
Defining the stages #
We created 4 different stages in which our tests run. These will happen stage-by-stage with a job concurrency of 2. During any stage, at most 2 jobs will be running at the same time.
$ cat /etc/gitlab-runner/config-main.toml
concurrent = 2
...
If your tests require more jobs at the same time, you can increase that concurrent setting.
The previous stage must succeed before the next one can begin. Here's the abbreviated version of our .gitlab-ci.yml.
stages:
  - preparation
  - building
  - testing
  - security

composer:
  stage: preparation

yarn:
  stage: preparation

build-assets:
  stage: building

db-seeding:
  stage: building

phpunit:
  stage: testing

codestyle:
  stage: testing

phpcpd:
  stage: testing

sensiolabs:
  stage: security
If you have a stage that consists of 3 jobs (like our testing stage), remember that the 3rd job might take longer to complete with a concurrency of only 2 jobs. Those first 2 will run in parallel, the 3rd one will have to wait for a free job slot.
Our pipeline also enforces PHPStan type aliases.
Asset building before testing? #
One of the steps we do different than most, is building the assets before we run our unit tests.
The reason is because of a test like this:
public static function boot()
{
  /* ... */

  $startServerCommand = '
      php -S localhost:9000/ -t \
      ./tests/Server/public > /dev/null 2>&1 & echo $!
  ';

  $pid = exec($startServerCommand);
During our unit tests, we spawn a webserver to test several of our key features;
- Uptime & downtime detection
- We crawl that test server to detect mixed content & broken links
- We test several of our custom HTTP header features
This test webserver spawns our public website, which in turn relies on compiled JavaScript & CSS (Laravel Mix). That gets compiled with webpack, which is why we run that asset-building stage before our unit tests.
Without it, our tests would simply fail as we can't render our homepage.
Crawling our own site - and various custom endpoints to simulate downtime or slow responses - has the additional benefit that we validate (most of) our website is functioning correctly before we deploy.
Setting dependencies #
Some of our stages depend on the output of the previous stage in order to work. A good example is our testing stage. When we run phpunit, it will fetch oru homepage which in turn relies on the CSS & JavaScript that got generated in the previous stage.
Gitlab CI allows you to set your dependencies per stage.
phpunit:
  [...]
  dependencies:
    - build-assets
    - composer
    - db-seeding
Setting the dependency makes sure the artifacts get downloaded from that particular job into this one, essentially copying the output of one job to another.
In this example, before we can run our unit testing we'll need:
- Our compiled assets (and the
public/mix-manifest.jsonneeded by Laravel) - The
vendordirectory of thecomposer install - A functioning database that contains our seeded data
Once that's done, it can run this job.
Caches vs. Artifacts #
Gitlab CI heavily relies on 2 concepts that we initially misconfigured: caches & artifacts.
A cache is, as the word implies, a local cache of the data. It's available only locally on the server and is not guaranteed to be present.
An artifact is - in our own words - what you want to store in a job to pass on to the next one. Initially, artifacts were what you wanted to survive out of a job. Like generated logs or error files, PHP Unit coverage results etc.
But this feature can be used broader than just exporting test results: you can use it to pass the output of one job onto the next one.
We first thought to use caches for this purpose, as these get stored locally and are available faster. However, the cache isn't guaranteed to be there and about 30% of our pipelines would randomly fail because it was missing a composer vendor directory, compiled assets, ... even though those jobs completed just fine.
composer:
  stage: preparation
  script:
    - composer install --prefer-dist --no-ansi --no-interaction --no-progress --no-scripts
  artifacts:
    paths:
      - vendor/
      - .env
    expire_in: 1 days
    when: always
  cache:
    paths:
      - vendor/
In the example above we define 2 critical pieces:
artifacts: what we want to upload back to Gitlab in order for our next job(s) to make use ofcache: what we want to store locally to speed up the next run of this job
So we ended up with Artifacts for everything we want to inherit for our next job and local caches to speed up composer installs, whenever possible.
This feels like code duplication in the YAML file, but it's a necessary step.
Some gotcha's in your .env.example #
We spawn a separate Docker container for our MySQL database. It uses a set of pre-defined environment variables to create a user with password and a database.
It's defined at the very top of our .gitlab-ci.yml.
variables:
  MYSQL_ROOT_PASSWORD: root
  MYSQL_USER: ohdear_ci
  MYSQL_PASSWORD: ohdear_secret
  MYSQL_DATABASE: ohdear_ci
  DB_HOST: mysql
Our Laravel application needs to be aware of these credentials too, in order to connect to this database. We solved this by setting these credentials in our .env.example file.
DB_CONNECTION=mysql
DB_HOST=mysql
DB_PORT=3306
DB_DATABASE=ohdear_ci
DB_USERNAME=ohdear_ci
DB_PASSWORD=ohdear_secret
In our composer job, we also prepare the Laravel config for use.
composer:
  [...]
  script:
    - composer install [...]
    - cp .env.example .env
    - php artisan key:generate
By coping the .env.example file, we provided the MySQL credentials for our testing environment.
Part of a safe pipeline is making sure debug mode is always disabled in production.
Missing deployment step #
An obvious step missing here is - perhaps - the most important one: deploying the application.
We haven't implemented this in Gitlab CI yet. Our deployment is automated of course, but right now it's not tied to the status of our CI pipeline. We can deploy, even if the tests fail.
We're still a small team and we make the decision to deploy thoughfully, but controlled. As many Laravel users would use Envoyer for their deployment, further automation could be done to integrate that too.
We'll highlight our deployment strategy (and the reasoning to not couple this in with Gitlab CI) in a later blogpost, there are a lot of nuances that deserve highlighting for that.
Grab our Gitlab CI pipeline #
You'll find the config on our Github: ohdearapp/gitlab-ci-pipeline-for-laravel.
If you find issues or have improvements, feel free to contribute them!
The basis for this pipeline has been heavily inspired by Loris Leiva's blogpost on Laravel pipelines and adapted to our needs & desires.
How to use our Gitlab CI? #
The abbreviated version is;
- Get a Gitlab account & commit your code to a Gitlab repository
- Copy/paste our .gitlab-ci.yml into your project
- Push to your repository
Now watch as Gitlab detects your config and will try to run your job. At this point, you might want to consider either subscribing to Gitlab CI or running your own Gitlab runners to execute the tests.
Oh Dear is built by a Laravel team for Laravel and PHP developers who care about pipelines like this one.
If you spot any improvements, gotcha's or have general remarks, we'd love to hear your thoughts in the comments below!